 Budget
Transactions
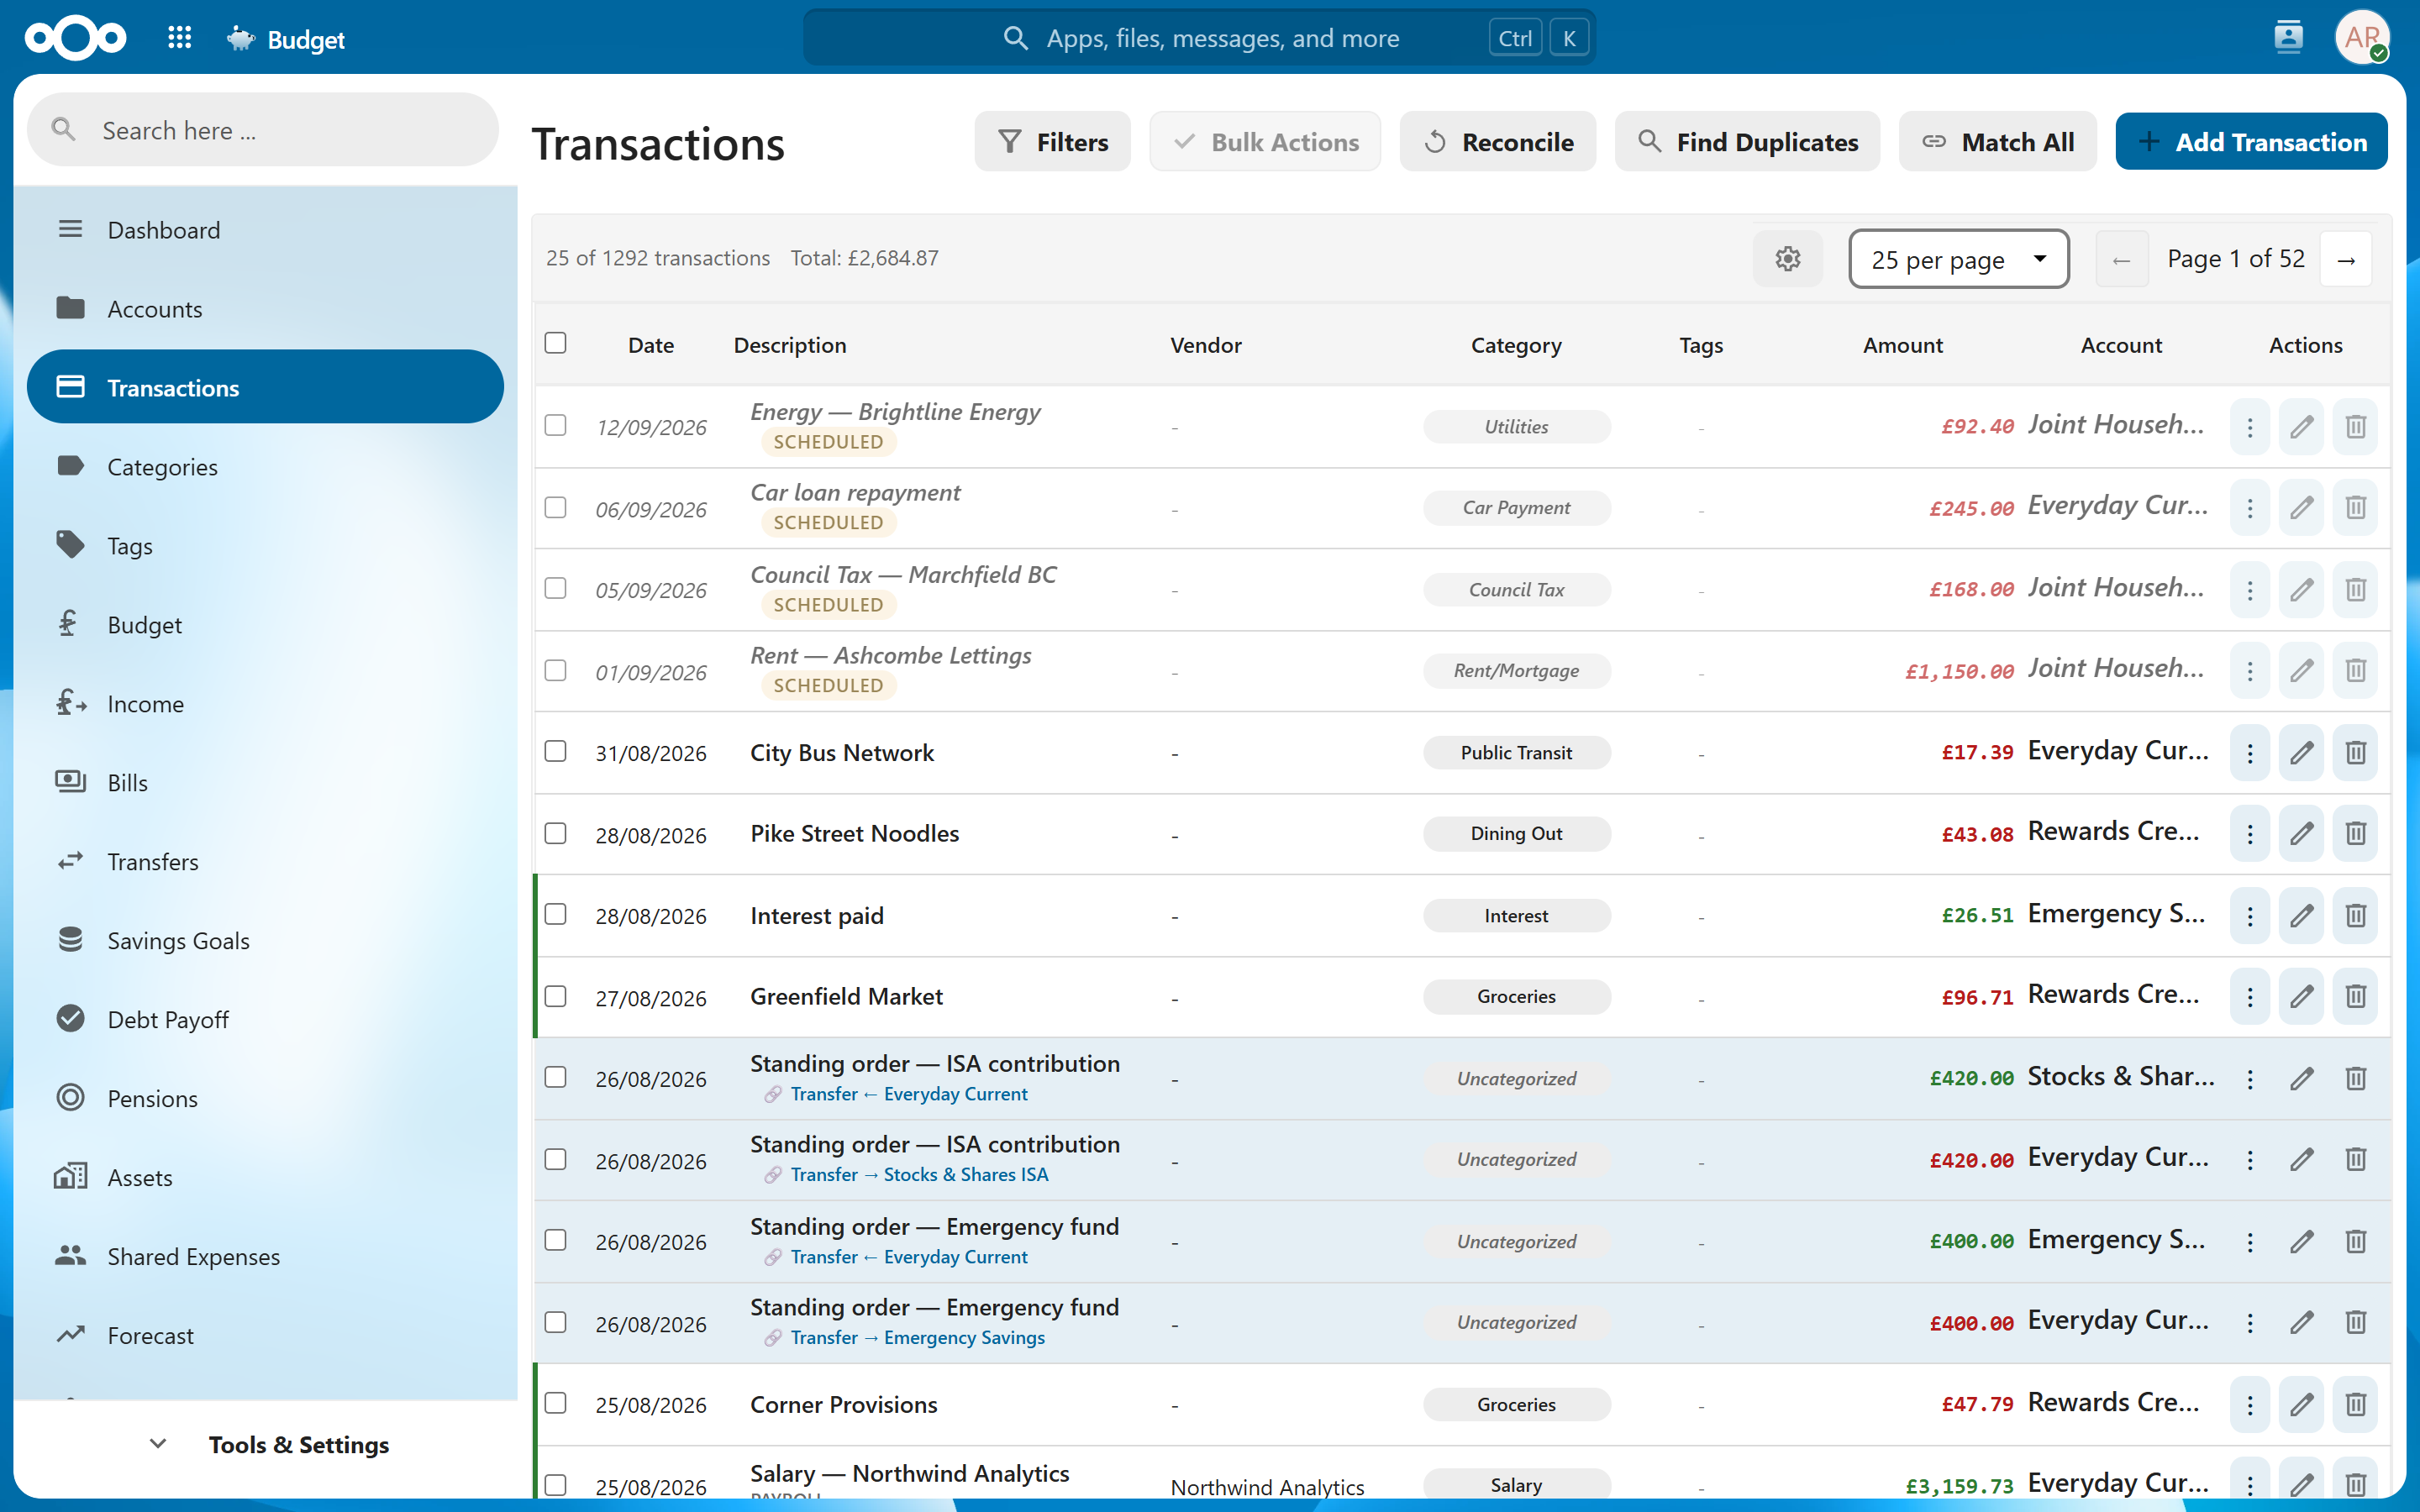
Transactions are the individual financial entries within your accounts -- every purchase, deposit, transfer, and payment. The transactions view is where you record, review, and organize your financial activity.
Adding a Transaction#
Navigate to an account's transaction list and click Add Transaction, or use the global add button from any page.
Form Layout#
The transaction dialog lays its fields out in three columns, so everything is visible at once without scrolling:
| Column | Contains |
|---|---|
| Transaction | Date, account, type, amount — plus the destination account and amount when the type is Transfer. |
| Details | Description, vendor, category, the Split across categories toggle, and any tags. |
| Extras | Receipts (on a saved transaction), notes, and the Exclude from forecast option. |
Turning on Split across categories replaces the category field with a Split Details table spanning the full width of the dialog, below the columns. On narrower windows the columns reflow to two, then to a single stacked column on a phone.
Transaction Fields#
| Field | Required | Description |
|---|---|---|
| Date | Yes | The date the transaction occurred. Future dates create scheduled transactions. |
| Description | Yes | A short description of the transaction (e.g., "Grocery store", "Monthly rent"). |
| Amount | Yes | The transaction amount. Always entered as a positive number; the type field determines the sign. |
| Type | Yes | One of Credit (money in), Debit (money out), or Transfer (between accounts). |
| Account | Yes | The account this transaction belongs to. Pre-selected if you navigated from an account view. |
| Category | No | The spending or income category. Used for budgeting and reports. See Categories. |
| Vendor | No | The merchant, payee, or payer name. |
| Reference | No | A check number, confirmation code, or other external reference. |
| Notes | No | Free-text notes for any additional context. |
| Exclude from forecast | No | Marks the transaction as extraordinary/one-time so it doesn't skew forecast projections. It still affects your account balance. Excluded transactions show a No forecast badge in the list. |
Tip: If you find yourself entering similar transactions repeatedly, use the duplicate feature to copy an existing transaction and modify only what changed.
Editing Transactions#
There are two ways to edit a transaction:
- Inline editing -- Click a transaction row in the table to expand it and edit fields directly.
- Modal editing -- Click the edit button on a transaction to open the full edit modal with all fields visible.
Both methods save changes immediately when you confirm. The edit modal is useful when you need to see all fields at once, while inline editing is faster for quick changes like updating a category or amount.
Keyboard navigation#
The transactions list can be worked without the mouse. When you are not typing in a field:
j/k-- move a row cursor down / up the listeorEnter-- open the highlighted row for editingx-- select or deselect the highlighted row (for bulk operations)
Press ? anywhere in the app for the full list of shortcuts.
Note: Transfer transactions have some editing restrictions. The transfer type cannot be changed after creation, and the linked transaction in the other account is updated automatically to keep the pair in sync.
Transaction Status#
Every transaction has a status that affects how it is counted toward your balance:
Cleared#
Cleared transactions represent confirmed activity -- they have occurred and are reflected in your bank statement. These are included in the current balance of the account.
Scheduled#
Transactions with a future date are automatically marked as scheduled. They appear in the transaction list in italics with a SCHEDULED badge and are included in the projected balance but not the current balance or the transaction list total.
This distinction lets you enter upcoming bills or expected deposits ahead of time without inflating your current balance. The projected balance (visible in the account detail view) shows what your balance will be once scheduled transactions clear.
Recurring bills create scheduled transactions automatically: marking a bill paid pre-creates a placeholder for the next occurrence. This placeholder is not a duplicate payment — it becomes the real transaction when that occurrence is paid. Each bill has a Create future transaction option to turn this off per bill.
Tip: Use scheduled transactions to plan ahead. Enter your rent, subscriptions, and other recurring payments with their expected dates so the projected balance reflects your true financial picture.
Filtering and Searching#
The transaction list includes a filter panel for narrowing down what you see. Filters are applied immediately as you change them.
Available Filters#
| Filter | Description |
|---|---|
| Account | Show transactions from a specific account. |
| Category | Filter by spending or income category, or pick Uncategorized for transactions with no category set. Picking a category also finds the split transactions with a part in it — see Splits under a category filter. Uncategorized leaves splits out: their categories live on the individual parts, so they are already categorised. |
| Type | Filter by credit, debit, or transfer. |
| Status | Show all transactions, cleared only, or pending/scheduled only. |
| Reconciled | Show all transactions, only reconciled, or only those not yet reconciled. |
| Date range | Filter by transaction date (from/to). |
| Created date range | Filter by when the transaction was entered into the app (from/to). |
| Amount range | Filter by minimum and/or maximum amount. |
| Tags | Filter by tag set tags assigned to the transaction. |
| Text search | Free-text search across description, vendor, reference, and notes. |
Multiple filters can be combined. Click Clear Filters to reset all filters at once.
Tip: The created date filter is useful for reviewing recently entered transactions regardless of their transaction date, which is helpful after a large import.
Configurable Table Columns#
The transaction table columns can be customized to show only the information you care about. Click the column configuration button (gear icon) in the table header to toggle columns on and off.
Available columns include date, description, amount, category, vendor, reference, notes, account, type, tags, and running balance. Your column preferences are saved per user and persist across sessions.
Note: At least one column must remain visible. The app prevents you from hiding all columns.
Bulk Operations#
Bulk mode lets you act on multiple transactions at once. Click Bulk Actions to enter bulk mode, which adds checkboxes to each transaction row.
Selecting Transactions#
- Check individual transaction checkboxes to select specific transactions.
- Use the select all checkbox in the table header to select all visible transactions on the current page.
- The header checkbox shows an indeterminate state when some (but not all) transactions are selected.
- When more transactions match the current filter than fit on the page, selecting the whole page offers Select all N matching transactions — click it to extend the selection to every matching transaction across all pages (useful for cleaning up a bad import in one pass). Changing the filter clears such a selection, so a bulk action never includes rows you are no longer looking at.
Available Bulk Actions#
| Action | Description |
|---|---|
| Delete | Permanently delete all selected transactions. |
| Reconcile | Mark all selected transactions as reconciled. |
| Unreconcile | Remove the reconciled flag from all selected transactions. |
| Edit | Apply a category, vendor, reference, or notes value to all selected transactions at once. A split transaction is skipped for the category only — its categories live on its parts — while the other values still apply. |
| Tags | Add or remove tags across all selected transactions at once. The Add and Remove lists are separate: a tag left unchecked in both is not touched, so tagging a large selection never disturbs the tags those transactions already carry. Global tags apply to everything selected; category tags are grouped under their category and state how far they reach, because a tag set belongs to one category and so can only cover part of a mixed selection. |
Click Cancel to exit bulk mode and deselect all transactions.
Warning: Bulk delete is permanent and cannot be undone. Double-check your selection before confirming.
Split Transactions#
A split transaction allocates a single transaction's amount across multiple categories. This is useful when one purchase covers multiple budget categories -- for example, a supermarket receipt that includes both groceries and household supplies.
Creating a Split#
- Open the transaction and turn on Split across categories. The category field is replaced by the Split Details table.
- Fill in an amount and a category on each row, and click + Add Row for as many parts as you need.
- The last row is worked out for you — it always holds whatever is left of the transaction total, so no part of the amount can be left unallocated. It is read-only for that reason. To change it, adjust one of the rows above it, or add another row below.
- Remaining, above the table, reads Fully allocated once the parts add up.
- Save the transaction.
Split transactions display a split indicator in the transaction list. To change a split, reopen the transaction — the parts appear as you saved them. Turning Split across categories back off removes the split and returns the transaction to a single category.
Note: A split carries no category of its own — the parts hold them. Each part counts toward its own category’s budget, reports and Spending by Category, so a split receipt is never left out of your figures and is never counted twice. Nothing writes a category back onto the transaction either: bulk edit and import rules both leave it empty, though a rule’s other actions — vendor, notes, tags, reference — still apply. If an older version left a stray category on a split, Settings › Repair Data lists it under Split Transactions Carrying a Category and clears just that category, leaving the split and every part of it untouched.
Note: The sum of all split amounts must equal the transaction amount. A part may be negative: a loyalty discount or coupon line on a receipt is a real part of the split, and the items either side of it add up to more than you actually paid.
Splits Under a Category Filter#
Filter the list to a category and the splits that spent in it appear alongside
everything else, marked Split part. Because a split covers several
categories, the Amount column shows the share belonging to the category you
filtered by, with the whole transaction named underneath — a £82.40 supermarket
trip filtered to Groceries reads -£12.40, of -£82.40. The total at the foot
of the list adds up those shares, so it matches the figure the
Spending by Category chart shows for that category.
The Amount cell cannot be edited in place on those rows: the figure is set by the split, not by the row. Open the transaction to change it.
A CSV export taken under a category filter follows the same rule — the Amount column holds the share, and a trailing Split of column holds the whole transaction. On an unfiltered export nothing changes.
Transfer Transactions#
Transfers move money between two of your accounts. When you create a transfer, the app creates a pair of linked transactions -- a debit in the source account and a credit in the destination account.
Creating a Transfer#
- Click Add Transaction and set the type to Transfer.
- Select the destination account in the To Account dropdown that appears.
- Enter the amount and other details as usual.
- The app creates both sides of the transfer automatically.
Transfer transactions display a transfer badge in the transaction list so you can distinguish them from regular credits and debits.
Converting an Existing Transaction into a Transfer#
An imported or manually added credit/debit can be turned into a transfer after the fact — useful when a bank-imported payment is really a transfer to one of your own accounts (for example, a payment toward a loan tracked as its own account).
- Open the transaction's action menu and choose Match transfer.
- If the matching transaction already exists in the other account, click Link as Transfer next to it. The list shows same-currency transactions with the same amount, plus — for accounts in a different currency — nearby opposite transactions of any amount, since the exchanged amount never matches exactly. Check the account and amount before linking a cross-currency pair.
- If the other account has no matching transaction (common for accounts with nothing to import, like a loan account), use the "No match? Create the other side" section: pick the account and click Create and link. The app creates the opposite transaction there and links the pair as a transfer.
The "create the other side" dropdown only offers accounts using the same currency — for a cross-currency transfer where the other leg is missing, create it manually with the converted amount and link it via step 2 instead.
After importing bank statements the app also scans automatically and links any pairs it finds (same amount and currency only), so manual matching is only needed when one side is missing, ambiguous, or in another currency.
Note: A transfer cannot be changed back into a regular transaction in one step — unlink the pair, then delete the leg you don't want.
Warning: Deleting one side of a transfer does not automatically delete the other side. If you delete a transfer transaction, check the linked account and remove the counterpart manually if needed.
Duplicating a Transaction#
To quickly create a transaction similar to an existing one, use the Duplicate action on any transaction. This opens the new transaction form pre-filled with all values from the original transaction (date, description, amount, category, vendor, etc.). Adjust any fields as needed and save.
This is especially useful for recurring expenses that are not exactly the same each time, like variable utility bills or grocery runs.
Receipt Attachments#
Receipts, invoices, and warranty documents can be attached to any saved transaction from the edit dialog's Receipts section — upload a new file or pick one already in your Nextcloud Files. Transactions with receipts show a 📎 badge in the list. Files always stay in your own Files space; removing an attachment (or the transaction) never deletes the file. See Nextcloud Integration for details.
Exporting to CSV#
The Export button in the Transactions toolbar downloads every transaction matching your current filters as a CSV file — the whole result set, not just the page on screen. With no filters set, that is every booking across every account, which is what a year-end export usually needs. The same button on an individual account's page exports that account.
Because the export follows the filters, you can narrow it before downloading: a single category, a date range, one tag, or anything else the filters offer.
What's in the File#
| Column | Notes |
|---|---|
| Date, Description, Vendor | As entered or imported. |
| Category, Account | Names, not IDs. |
| Type | Income or Expense. |
| Amount | Signed — expenses are negative, income positive — so the column totals correctly in a spreadsheet. |
| Currency | The account's currency. Amounts are not converted; a multi-currency export carries each in its own currency. |
| Reference, Notes, Status | As stored. |
A transfer between two of your own accounts appears as two rows, one negative and one positive, so it nets to zero in the total rather than counting on both sides.
Note: This is a plain ledger of what you filtered — nothing is removed. That differs from the Reports exports, which leave out accounts and categories you have excluded from reports.
Related Features#
- Accounts -- Manage the accounts that hold your transactions
- Categories -- Organize transactions into spending and income categories
- Tags -- Add additional classification dimensions to transactions via tag sets
- Importing Bank Statements -- Import transactions from CSV, OFX, or QIF files
- Import Rules -- Automatically categorize transactions based on description or vendor patterns
- Nextcloud Integration -- Attach receipts from your Files and find transactions in Nextcloud's unified search
Settings#
- Date format -- Controls how dates are displayed throughout the app, including the transaction list. Change this in Settings > General.
- Number format -- Controls decimal and thousands separators for amounts. Change this in Settings > General.